QuinLED-An-Deca Pinout Guide
| GPIO | Board | Use | Notes |
|---|---|---|---|
| IO16 - FET6 | T1 | Color or white dimming channel | |
| IO17 - FET7 | T2 | Color or white dimming channel | |
| IO18 - FET8 | T3 | Color or white dimming channel | |
| IO19 - FET9 | T4 | Color or white dimming channel | |
| IO21 - FET10 | T5 | Color or white dimming channel | |
| IO25 - FET1 | B1 | Color or white dimming channel | |
| IO26 - FET2 | B2 | Color or white dimming channel | |
| IO27 - FET3 | B3 | Color or white dimming channel | |
| IO14 - FET4 | B4 | Color or white dimming channel | |
| IO12 - FET5 | B5 | Color or white dimming channel | |
| IO32 | DS12B20 | Onboard tempsensor | |
| IO13 | IO13 | External GPIO | Touch/ADC available |
| IO22 | IO22 | External GPIO | *Can have external pull-down resistor |
| IO23 | IO23 | External GPIO | *Can have external pull-down resistor |
| IO32 | IO32 | External GPIO | One-Wire shared with DS12B20 (without can do Touch/ADC) |
| IO33 | IO33 | External GPIO | Touch/ADC available |
Wiring Guide
Wiring LED strip seems simple but becomes more complex the longer the length becomes. Before we talk wiring though, take a look at my article about 12v vs 24v LED strip. In the following diagrams I will be talking about 24v LED strip only, when using 12v take into account that the maximum lengths mentioned should most likely be kept shorter, the same goes for very cheap LED strip! On the other hand, high quality LED strip at 24v can often be made longer then the stated 2.5m.
While following below guides, please make sure not to exceed the calculated power limits for the board and individual ports! And last, after reading the below wiring diagrams please also take a look a the wire thickness needed page to determine what thickness cable you require for your desired lengths and application! Also remember to provide proper cooling for your LED strip!
Simple Guide
For connecting strips up to 2.5m or 8.2 feet you can get away with connecting only one end of the strip. Going beyond this length will most likely cause faded light emittance at the end of the strip!
Short length White LED strip
Here is an example of connecting 10 white LED strips:
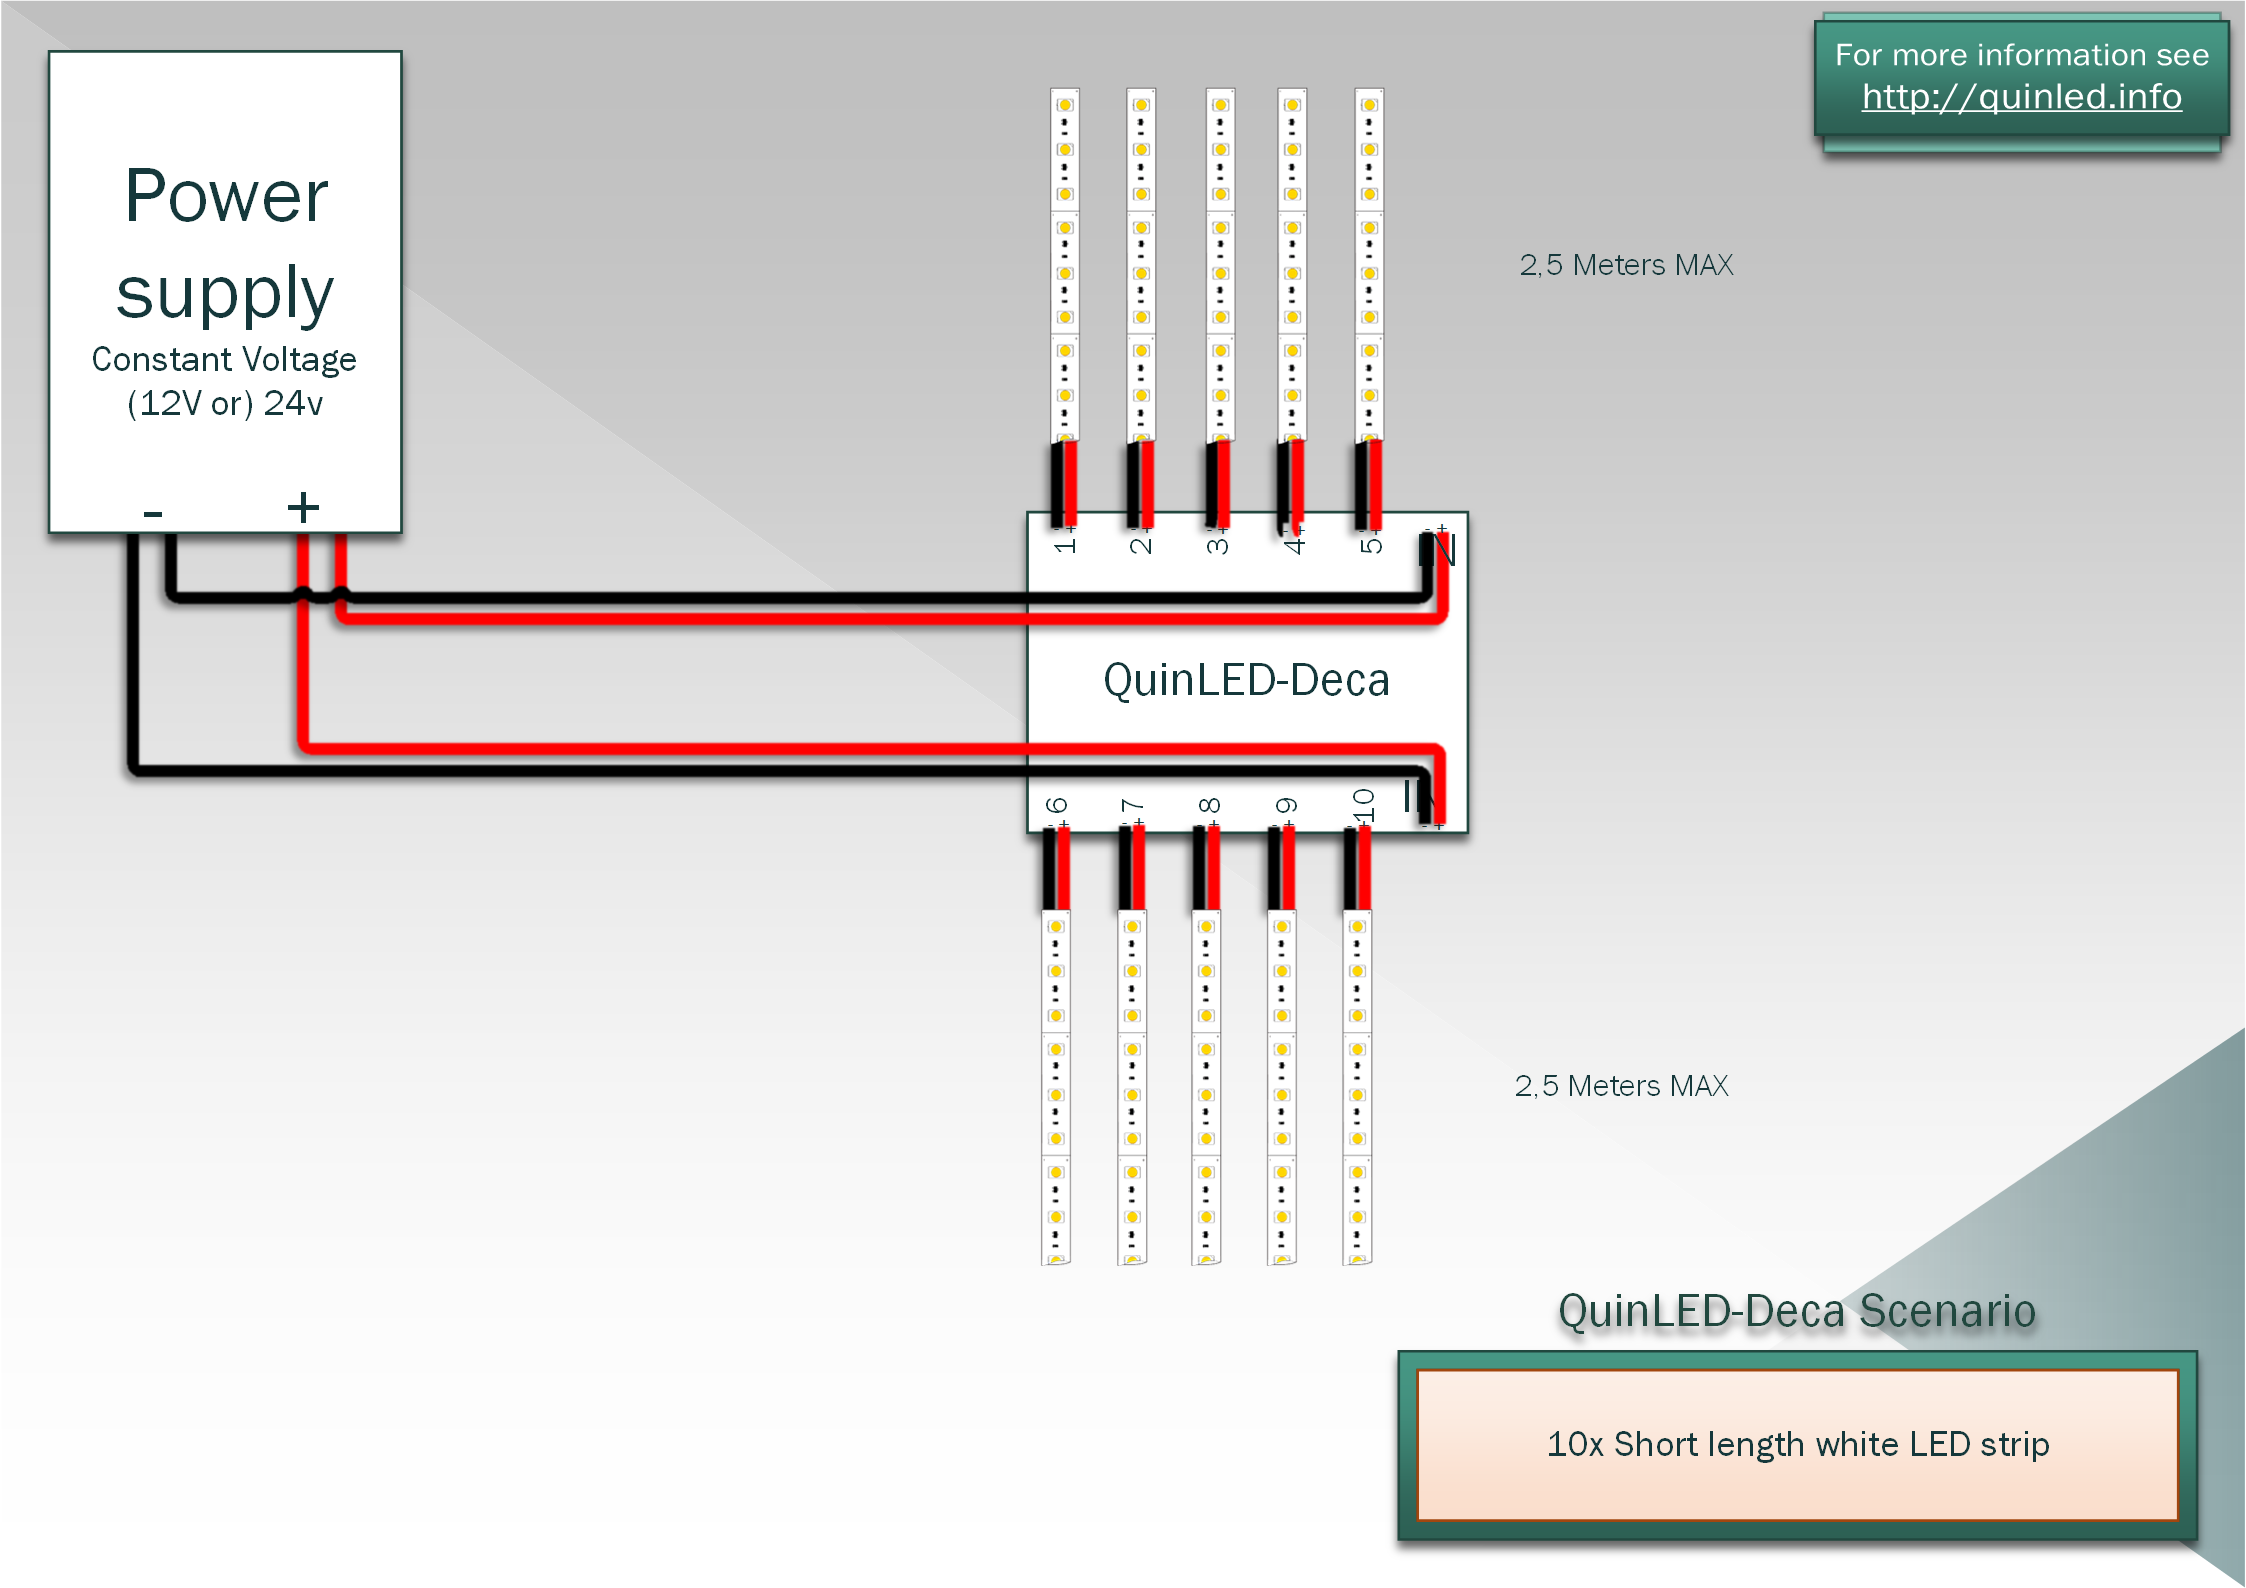
QuinLED-An-Deca has 10x Positive and 10x Negative screw terminals to connect 10 strips. As shown in the image it also has 2 connections to connect your power supply. It’s highly discouraged to connect two different power supplies at the same time. Although all channels can work while only connecting the top or bottom power supply feed, when running high currents (multiple high power White LED strip) it’s recommended to use 2 sets of cables from your power supply and connect them to the QuinLED-An-Deca.
Short length 2x RGB+CCT LED strip
Connect RGB+CCT LED strip requires 5 channels per strip, since QuinLED-An-Deca has 10 channels you can connect 2 of these strips at the same time. Here is an example of connecting 2 short strips:
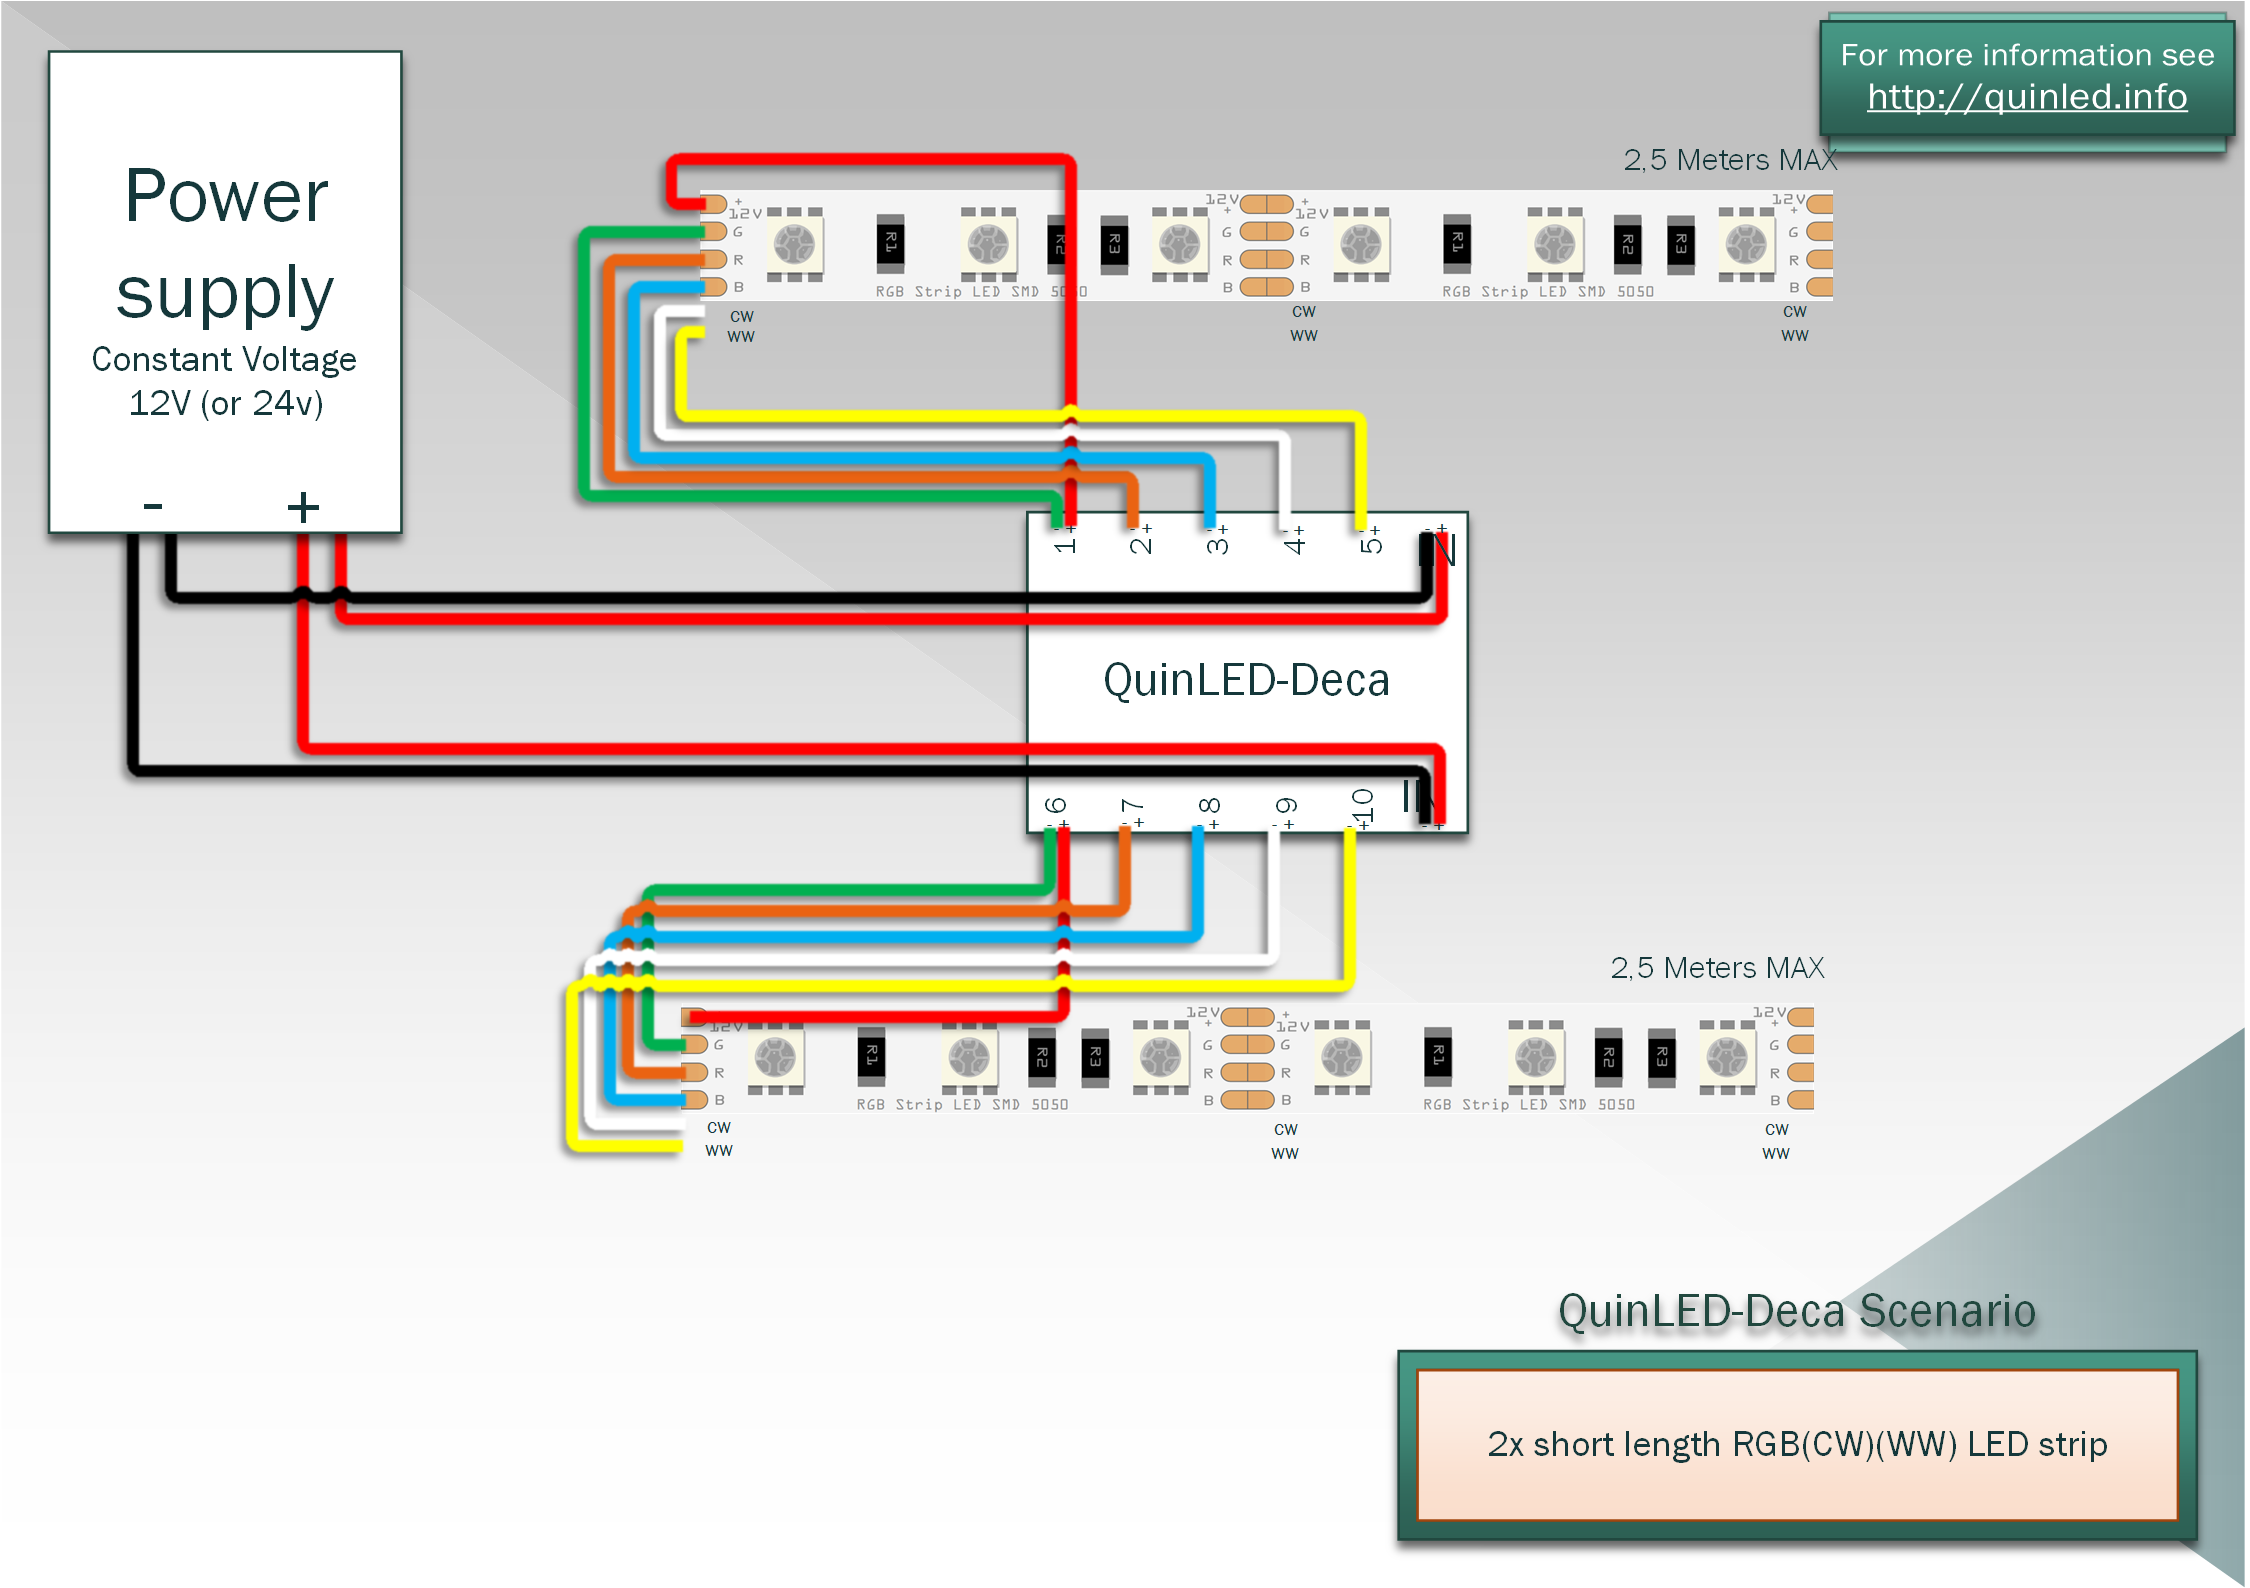
Although this looks complicated in the drawing in reality it’s pretty easy to connect it up. Just connect all the color wires to the negative terminals and then you can configure each terminal as that color for that strip in the software.
Advanced Guide (longer lengths)
Although hooking up a 5m strip directly to the QuinLED-An-Deca is technically no problem, in most cheap 12v strips the voltage drop becomes so high that a very visible fade off shows at the end of the strip. Most often this effect is not desired. This is what these advanced diagrams are for. If you are not bothered by this, are using a high quality LED strip or want to try only feeding the strip from one side, there are no dangers in doing so. These diagrams show you the smartest way to solve this issue while still using a single controller to hook up longer/more LED strip.
Personally I only “single feed” most of my LED strips, but often they are not longer then the 2,5m specified in the diagrams and I generally use high quality 24v LED strip.
All of this looks complex in the drawings but mostly isn’t in reality, it’s just hard to illustrate! 😉
As a general tip if you do want to connect longer lengths of LED strip consider using multiple shorter segments instead of 1 large segment. Because everything is linked through Domotica, sending a command to 1 long strip or the same strip split into 4 parts takes just as much effort! Even if those strips are connected to different controllers and power supplies!
Medium length White LED strip
Medium length is considered to be up to 5m or ~16 feet. There are generally two ways you can hook this up, either by double feeding (both ends of the LED strip) or by middle feeding. In both cases power only needs to travel a maximum of 2.5m through the strip and voltage should not drop off too much.
*When double feeding an LED strip you can roughly halve the amount of current each cable needs to transport and thus use thinner wires then when middle feeding the cable! Please see this article to learn more about the thickness of the cable you need!
Here is an example of double feeding 10x White LED strips of 5m in length:
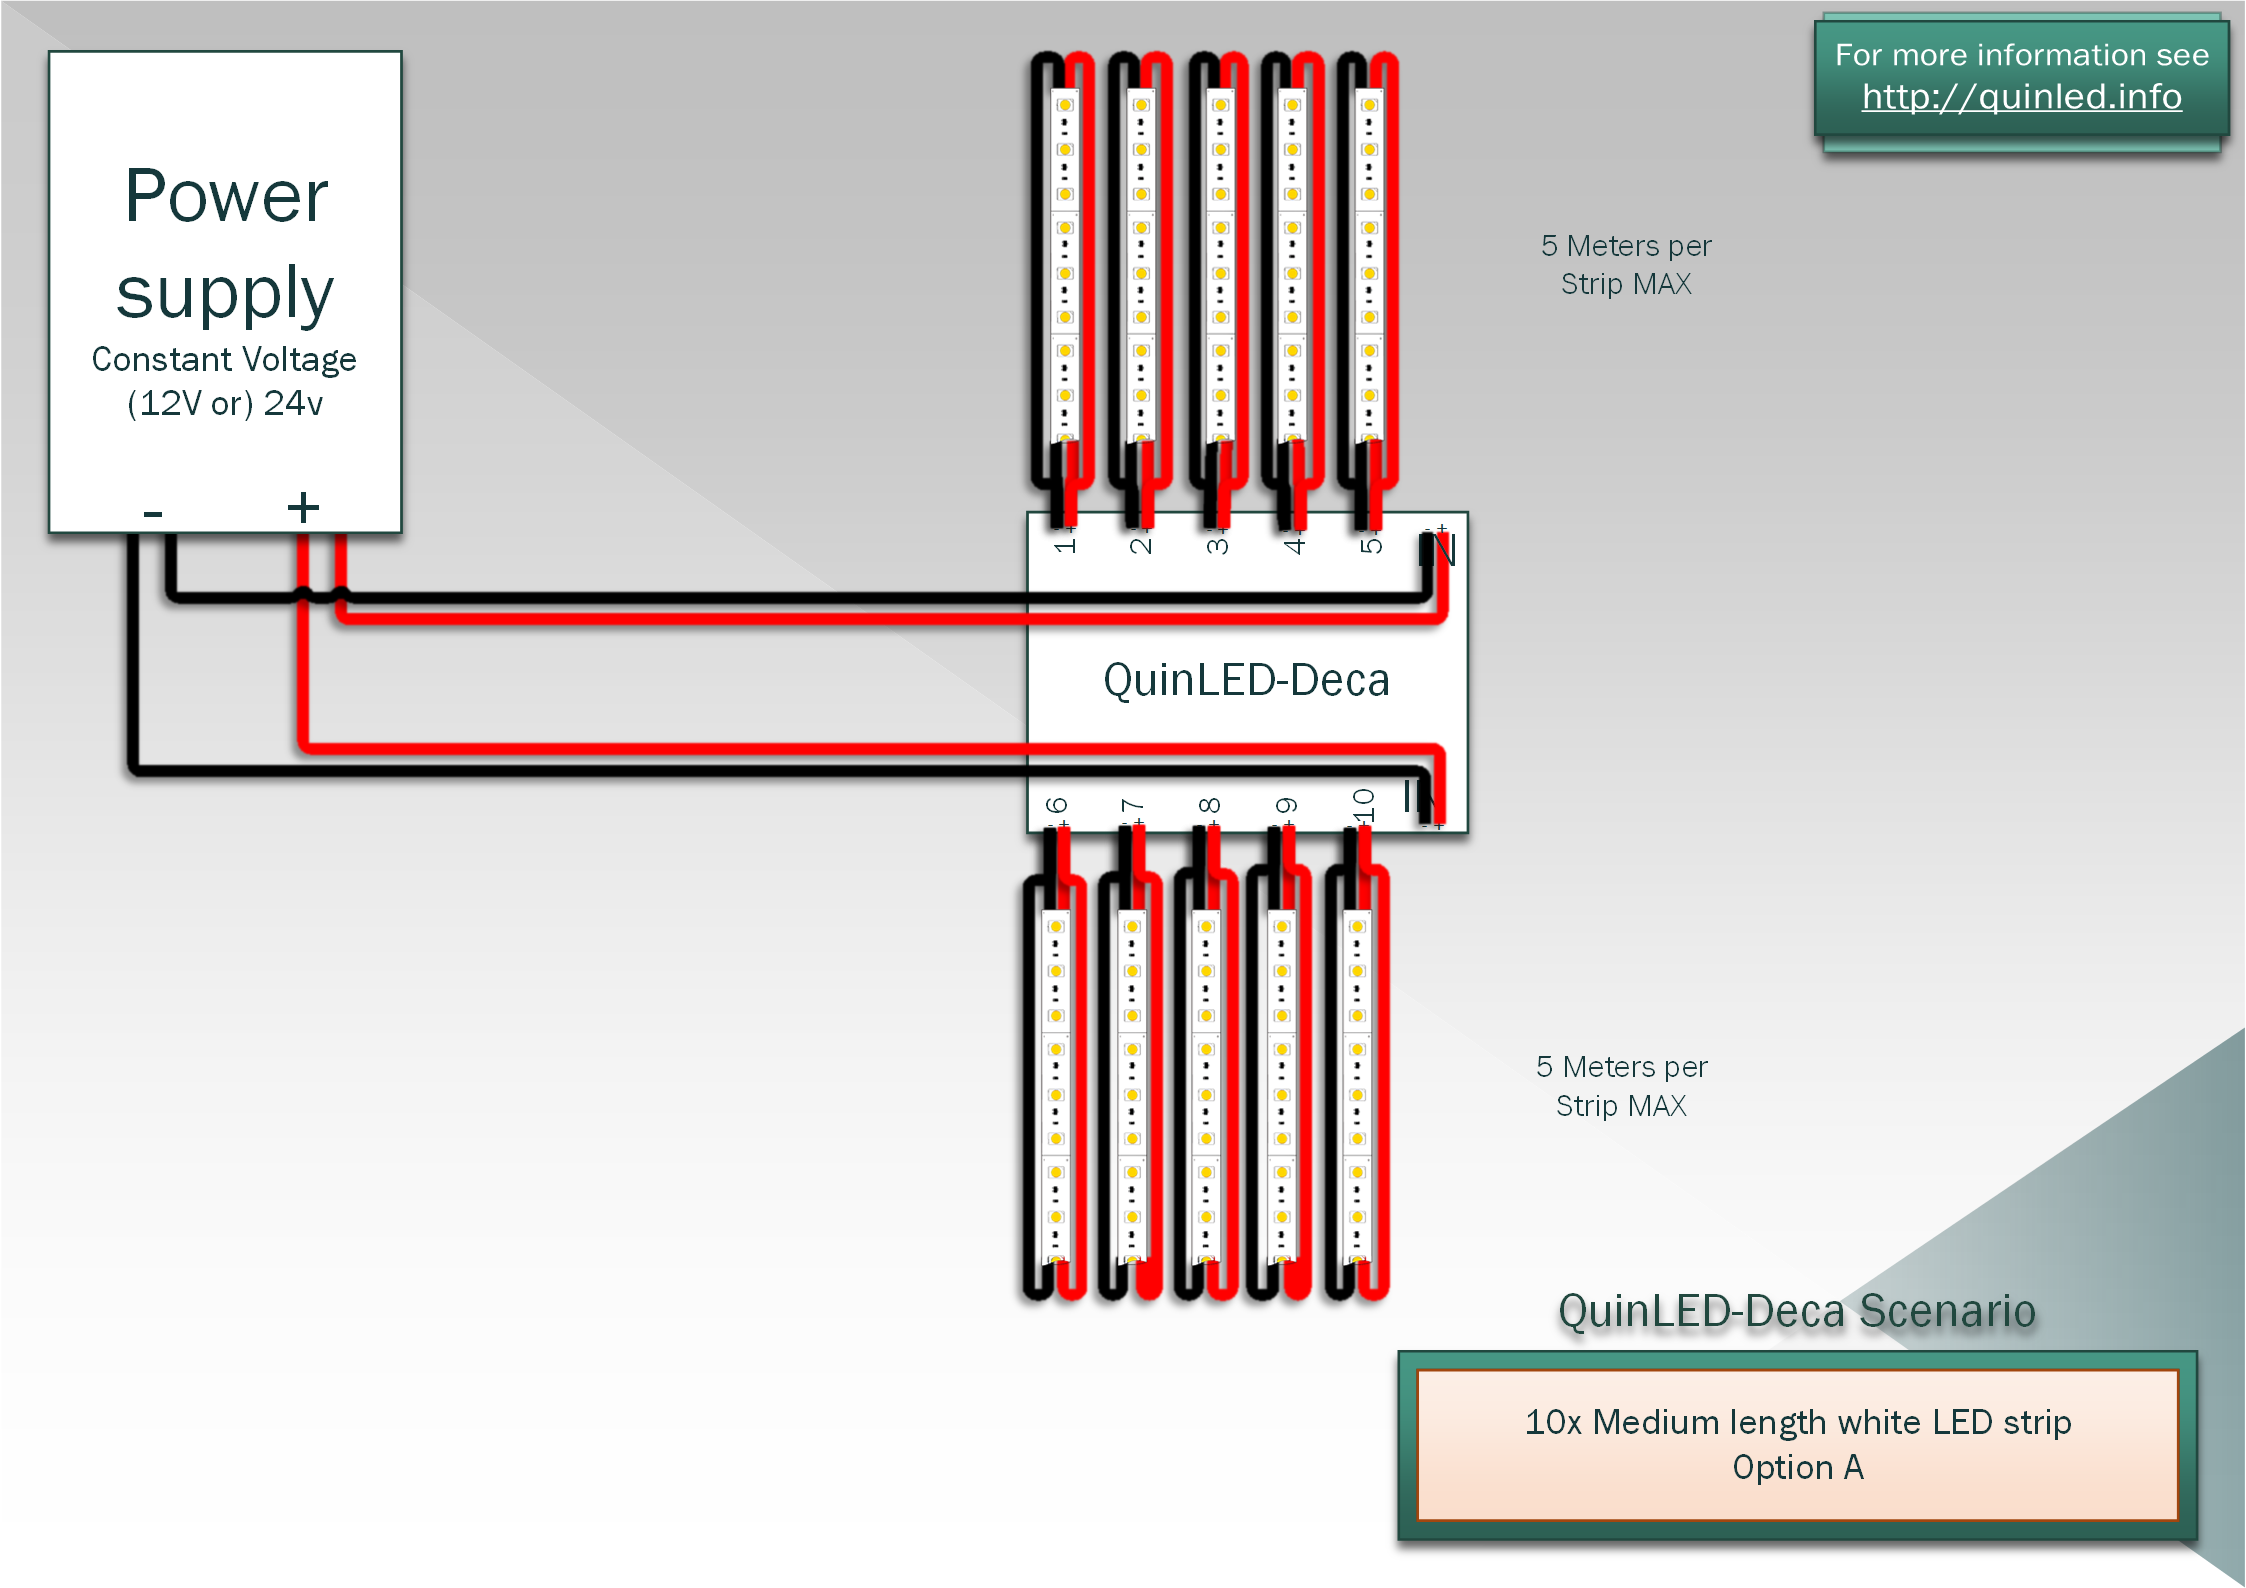
The scenario shows 10 LED strips which are all double fed
And below is an example of the same 10x White LED strips of 5m in length but now middle feeding them:
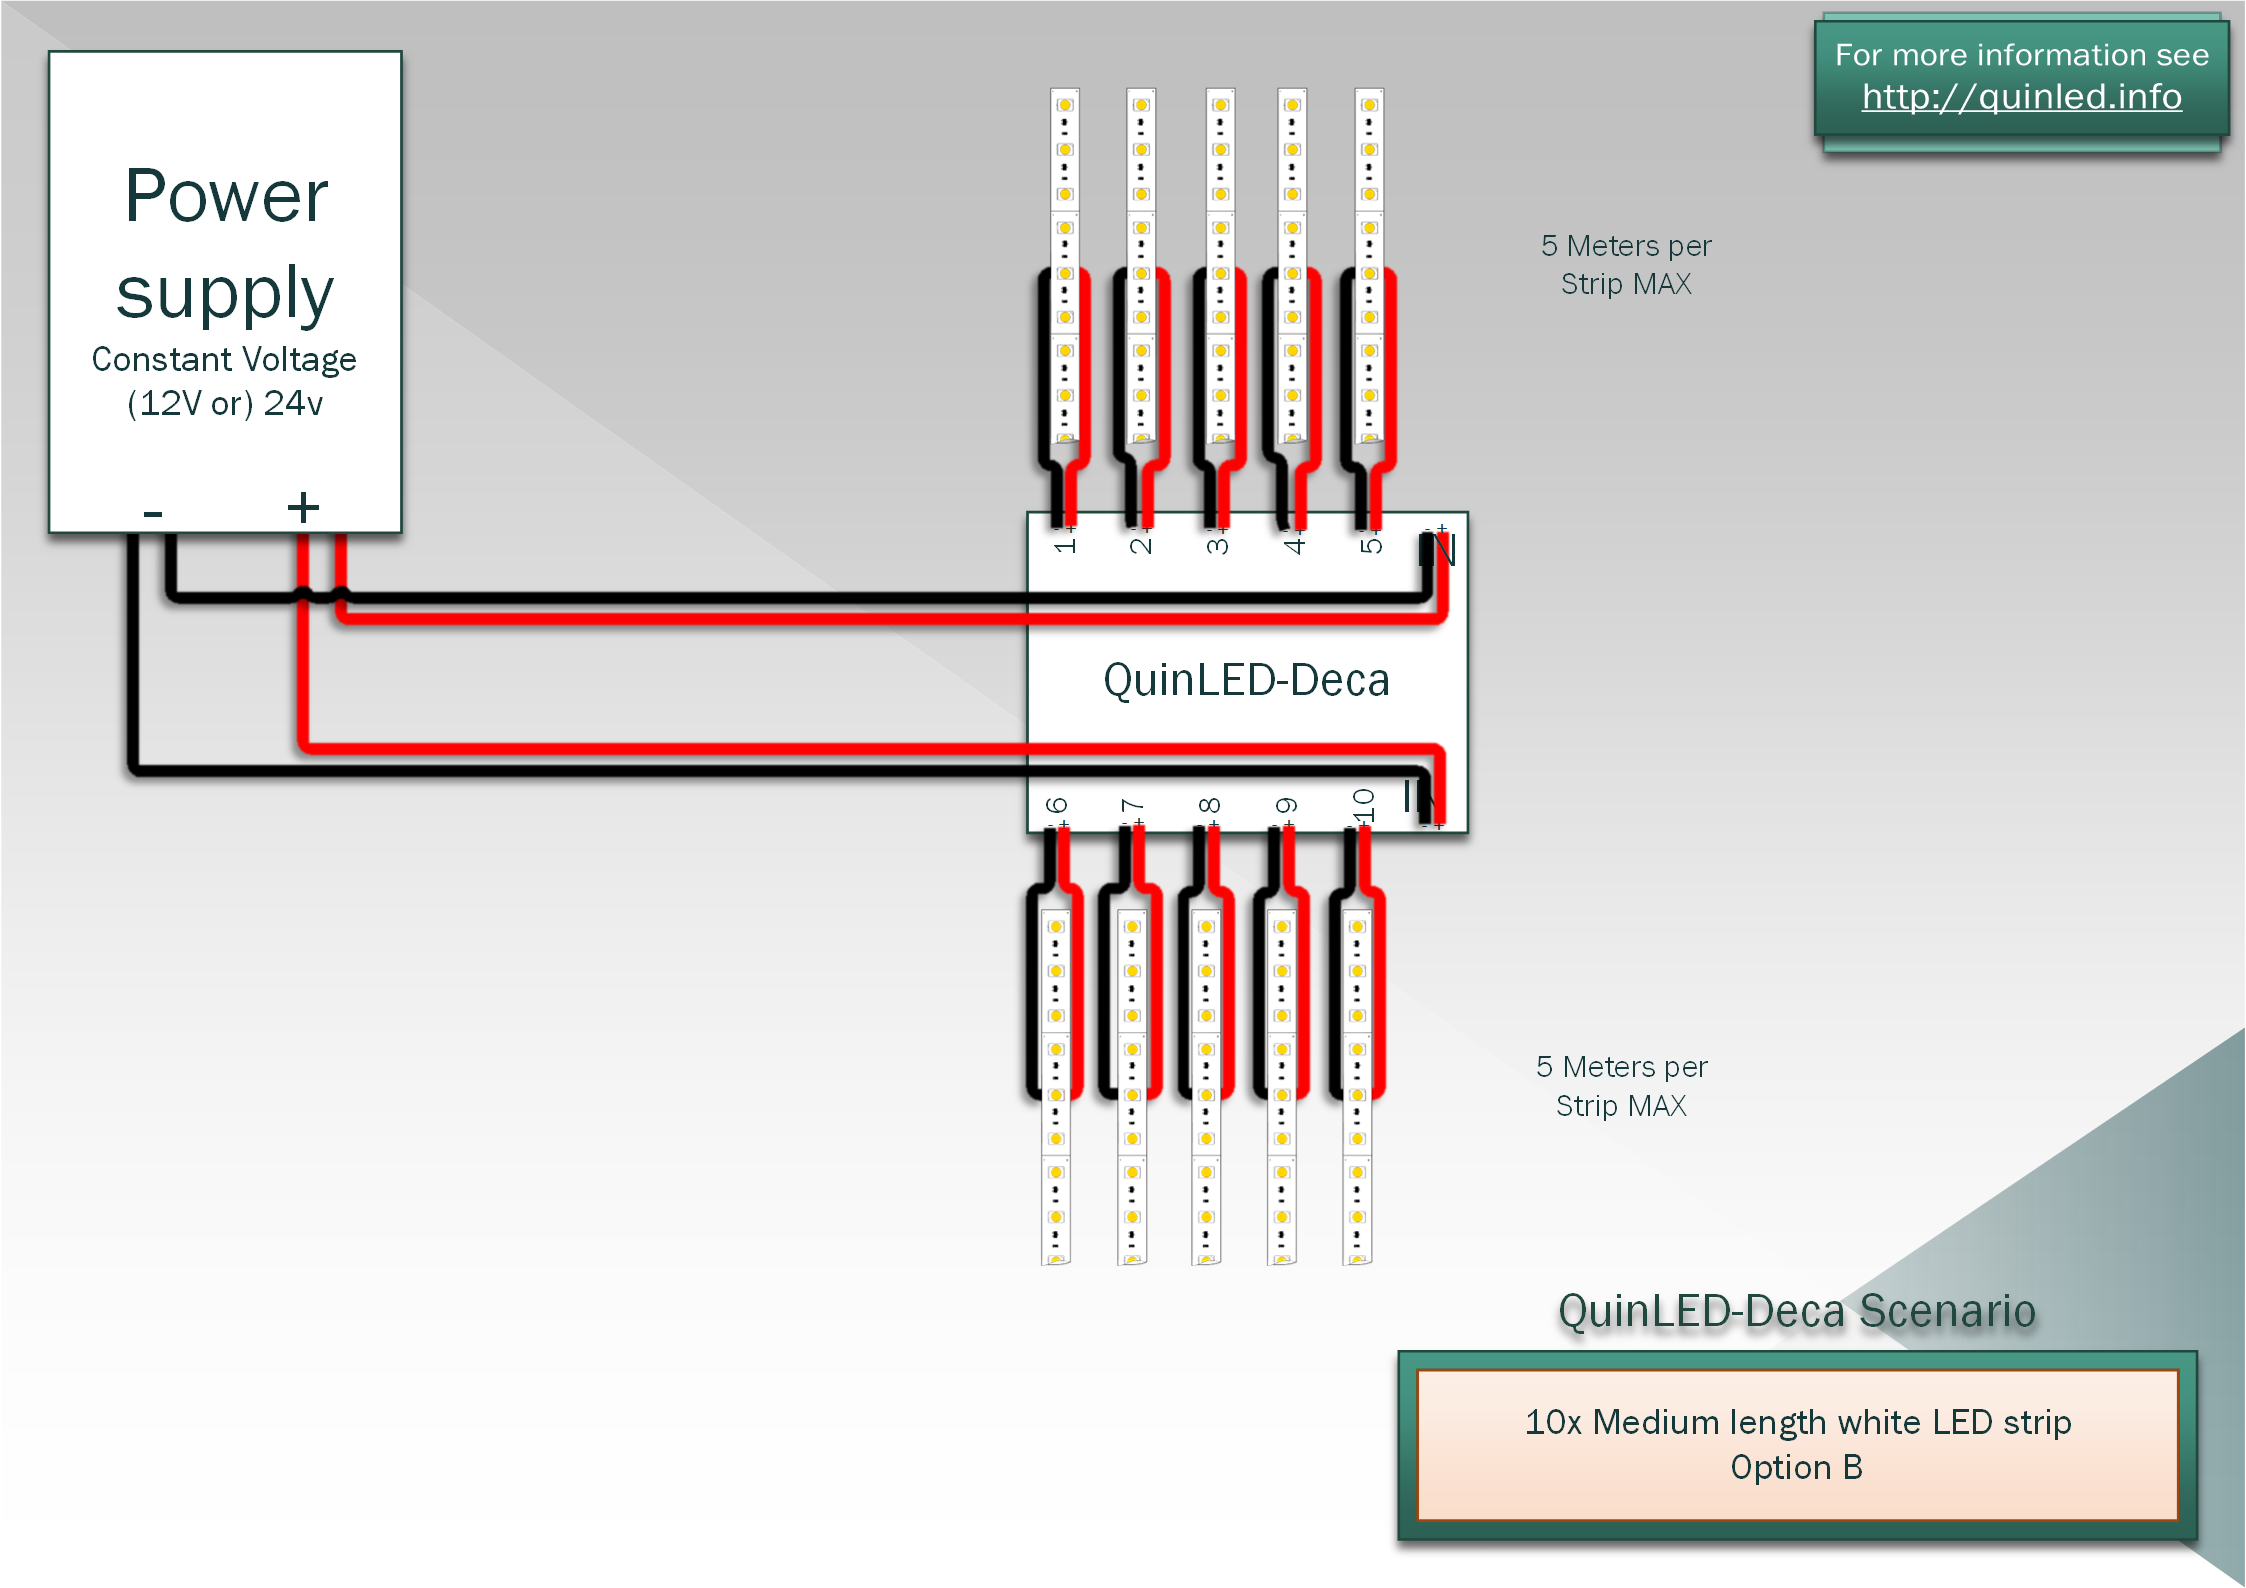
The scenario shows 10 LED strips which are all middle fed
The middle feed scenario often ends up being the most practical. Although you need slightly thicker wire you need less of it and only need to worry about 2 cables per LED strip instead of 4 with double feeding!
Medium length RGB+CCT LED strip
Hooking up a 5m RGB+CCT strip basically works the same way as hooking up a white LED strip, there is just an extra wire per color to think of. Again you have the choice to either double feed them from each end or to do some soldering and middle feed them. Below diagram is for middle feeding the strip since it uses the least amount of wires.

The scenario shows 2 RGB+CCT LED strips which are both middle fed
Long Length RGB+CCT LED strips
If you wish to run more than 5m LED strip you are going to need to do some serious cable work to get all the power to go to where it needs to go without too much resistance running everything through the LED strip. Below is an example of a 10 meter (32 feet) RGBW LED strip which is fed using three points. This way the maximum distance power needs to travel is again a maximum of 2.5m through the strip which should be ok for most strip (especially if using 24v). This diagram looks quite complex but in reality the wiring it simple, there is just a lot of it!

Ending remarks
- If you want to connect even longer strip then 10m you need to create more feed in points and this will take some careful planning. But as stated in the beginning of the article, try and and rethink your desired situation and maybe use several smaller length segments instead of a single long one! Also keep in mind the maximum amperage rating per port vs of the total board, by using very long length LED strip you will exceed the rated per port currents and you will need to split the desired length over over multiple output ports anyway and thus use multiple segments.
- If using very long cables is impractical in your situation, you can still use multiple segments but do so by using separate QuinLED’s and power supplies. Once everything is online and connected through Domotica software, it’s very easy to make it work like a single strip!